Thursday, September 27, 2012

How To: Look Amazing Only Using 5 Products!

You ever have those days where you want to look pretty, but you don't feel like putting in the time to get super glam? I have those days all the time! I never have the time to contour my face like crazy, try on a new lipstick and look like a drag queen, so I keep it very, very simple to save time. Here is what you will need to look like you are naturally flawless with only five products.

Here is what you will need:

1.) Vaseline

2.) Foundation

3.) Mascara Wand

4.) Concealer

5.) Powder


No Brushes Necessary! Watch and See :-)

Step 1: Cleanse, Tone & Moisturize your skin:
My skin is super sensitive, so I use things that are all natural and contain very little to no fragrance. This is my current regimen. I switch up my products every few months, but this is what I have been using for the past 6 months and it has worked the best for me.

I have been using Aveeno face scrub to cleanse my skin lately. Aveeno is one of the few face scrubs I have used that doesn't irritate my skin. The last time my skin was this even, I was in 8th grade! I use Aveeno every other day and it has given me great results.

In high school, I used astringents or sometimes rubbing alcohol as my toner. At the time, strong astringents definitely helped with my acne. Now that I am getting older, I need to keep as much moisture in my skin as possible, so I use an all natural oil to lightly tone my skin.

Benefits of Almond Oil

I usually use almond oil at night time, but for colder weather I use it day and night. I really love almond oil because it's not greasy, it's actually a very light weight oil and it naturally has vitamin E: Vitamin E helps keep the elasticity in the skin for a LONG time. I use almond oil as a toner because it lightly cleanses, refreshes and makes my skin feel really soft after I washed my face. I use a few drops on a cotton ball and it lasts all day. I noticed a lot of expensive eye creams and face moisturizers had almond oil, so I figure I could save money and use straight almond oil for my skin. Almond Oil has amazing benefits for hair, skin and nails.
Here are a few websites that explain:

- www.buzzle.com
- www.naturalremediescenter.com


I finish off with a light weight moisturizer from Simple. I found this product from CVS and I really, really like it. It doesn't make my skin feel tight or heavy, just leaves a balanced moisture to my skin.

This is my skin after my daily regimen. This is normally how I look on set for work: No makeup, no photoshop, straight from my camera phone.


There are times when I am up super late at night and the next day you can clearly see the fatigue in my face. For days like these, I only need a few products to hide a few things. Let me show you how.

Step 2: Vaseline & Mascara Wand
These two products are the perfect combination for two situations: Your brows & your lashes.
This is what I use to groom my brows in one direction as well as creating a little shine to my lashes.
It's a lot less harmful than mascara and looks just as good. If you are blonde and prefer darker lashes, definitely go for a brown mascara to darken them up.

Step 3: Foundation

I LOVE Make Up For Ever Liquid Foundation for photo shoots and runway! On myself, I currently use Inglot Creme Foundation #36
It is $18 USD and I LOVE the way it smells!! It smells like a garden, or greenery, or lettuce... it's hard to describe, but it's very fresh and clean. The creme is water based and very lightweight; and this is literally the only foundation I have found that matches me perfectly. I only need a dime size amount to cover my face and I am good for the day. I use my ring finger and apply all over.

Step 4: Concealer
I switch back and fourth between MAC NW45 Concealer and NYX Concealer. For today's look, I used NYX "Nutmeg" Concealer.
I used my ring finger to apply the concealer in areas of hyper pigmentation, such as: under my eyes, around the nose, around the mouth, on scars and my chin.

Step 5: Powder

I use MAC "Deep Peach" Loose Powder. Apply your powder in the same place you applied concealer to set it in and keep it in place. You can use a sponge or flat brush if you feel it is necessary, but I use my finger once again and lightly tap the powder in place.

To wrap it up: I personally love a little highlighter on my cheekbones, so I use Vaseline again as my highlighter on my nose, my cheekbones, my lips and my collar bones. Guess what I used to apply the Vaseline? My fingers only!

The one question people ask me when they watch me do makeup is: 

Why Use Fingers?

The reason why I use my fingers is because the texture and warmth from your fingers can do what no other brush on the market can do to create a natural look: your fingers literally melt the makeup into your skin to make the makeup look like skin and not makeup sitting on your face. The Beauty Blender is very similar to fingers, but it absorbs makeup. Your fingers can glide and melt the makeup into skin which is great for hd cameras, so I personally prefer using my fingers while on set of a photo shoot.


This is the final look:
Here's a before and after (with a flash) and no photo shop was used:

The makeup is SO subtle that you really cannot tell too much of a difference.
BUT what you can notice is:
- the skin looks more even
- there is no darkness nor bags under the eyes
- your skin will look more fresh and 

This is the exact same method I use with models for test shoots. For some models, I do fill in their brows, or contour their nose, but I usually only use very few or no brushes for the first look, then build from there. A lot of people think I am not applying makeup for these natural looking photo shoots, but believe it or not, I am! Very little to no photo shop was used.
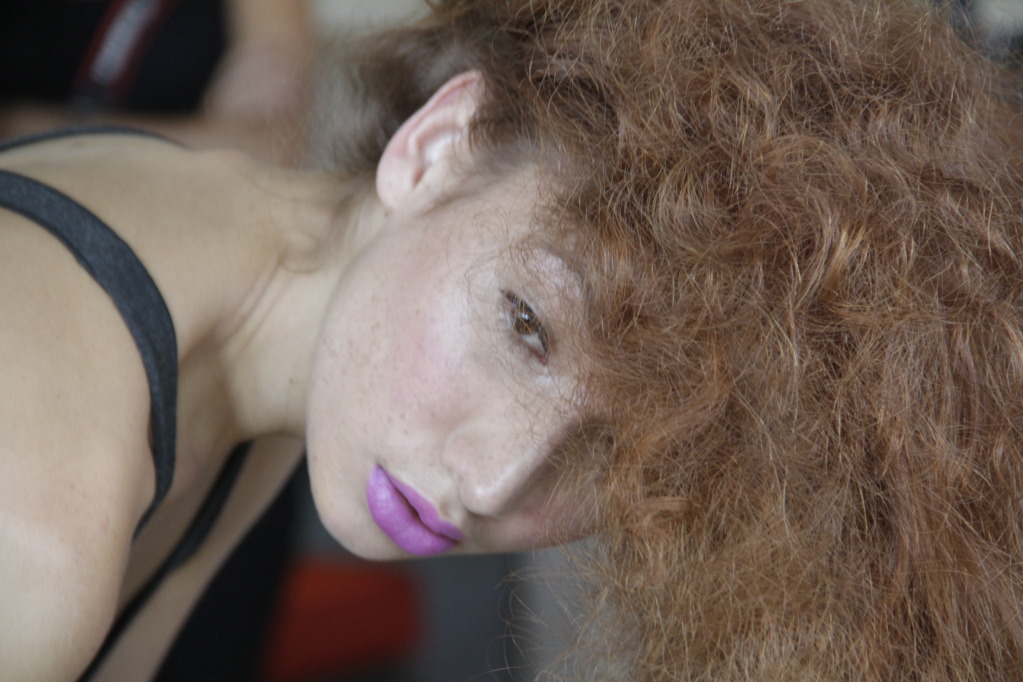
For Example:

Arlynn | The Rock Agency
Photography | Escalante


Natalie | Factor Women
Photographer | Jennifer Avello

 Samantha | Ford Models
Photographer | Jennifer Avello


And there you have it!! You will easily be done with your makeup within 5-10 minutes AND look naturally flawless with just 5 products. I hope this helps!

Monday, September 24, 2012

CLEONS Destruction Show in NYC!

After 5 long years, Chad finally debuts a collection in New York Fashion Week!


- September 15th, 2012 -
I was so pumped up to be there and support him for another season! The makeup look for the show was focused on the Dark Knight inspired garments. Myself and the artists from New York created dark smoky eyes, contoured cheeks and nude lips for all the women; male models had clean, fresh makeup. Here are a few snapshots from backstage!

Photography by: Karina Antigua


And here are photos as well as video footage from the runway!
Video Reel by| Jordan Lindley
Photography by |  NonFiction Photography, Eddy227 Photography
The Opening!

Dancer Sherrod opens the show
Model | Alejandra


 Model | Taylor


Model | Juan


Model | Katie


 Model | Kevin


<< Here's the link to the video! >>

Saturday, September 22, 2012

New York Fashion Week | S/S 2013


Yep, I was there^.
I assisted Makeup Artist Ashunta Sheriff for Cesar Galindo's S/S 2013 second collection on Sept. 13th, 2012 in The Mohawk Group. Cesar Galindo was the 4th runner up from Season 2 of Bravo's "The Fashion Show"


Cesar's S/S 2013 was full of color, beautiful details to a woman's curves, technical tailoring and shimmering fabrics. I was SO excited to be there, I showed up two hours early!! I also had the chance to work with and meet Angie Peek, an amazing artist from LA. We started the models around 2 pm, rehearsal was at 3 pm, showtime was 4pm. The makeup & hair team had very little time, so we had to work fast.
I took a few photos with Instagram :-)
This is where the show was held: The Mohawk Group in downtown NYC.


Here is Ms.Sheriff!!


Ashunta gave us a demo before we started; she wanted to make sure we applied the makeup almost exactly the way she does so the models looked the same.


The hair team was O&M. They were so amazing!
O&M created custom wigs and huge curls within two hours for all 25 models.


This ^model^ is Lisa Jackson from ANTM Cycle 9.
She was one of the muses for Cesar's show.
--
The Look for S/S 2013: Dewy skin, Flushed Cheeks, Clumpy mascara, Clean eyes, Lilac lips.


It took all the artists almost 20 minutes to create the perfect lavender shade for every model. All the artists mixed Make Up For Ever Pigments, OCC Lip Tars and MAC Lip Pigments to create the lip color for the show. Ashunta also gave us a few makeup goodies from Mary Kay.


I was ready for WAR!
----------
This is Zang from Ford Models. This is the first model I worked on.
This is Mary-Kate, a fresh face model from Muse Managament. She was the 2nd model I worked on.
This is Lakota from Muse Managament. She was the 3rd model I worked on.
----------------

Here are a few images of the work backstage created under Key Artist, Ashunta.
Photos by Vivien Killilea.


Here are a few images of the work backstage created under Key Artist, Ashunta.
Photos by Natasha Lynette.


Photos from the presentation at The Mohawk Room.
Photo credit: Natasha Lynette.


Here are a few more photos from the presentation at The Mohawk Room.
Photos by: Vivien Killilea.


I'm still on the hunt for more pictures! I'll post them later when I can find them :-)

More Links to Cesar Galindo's work:
- Mercedes Benz Fashion Week
- FashionPulseDaily.com
- Ouch Magazine